|
 |
|
|
Unreal Gamma ExplainedWhat is Unreal doing with
Textures What Unreal is doing with
Shaders Making Shaders and Textures
match BackgroundTo understand what is happening in Unreal there are a couple of basic
concepts about what Gamma does to images that need to be clear. I will not go
over all the principles of Gamma since there are many references on what Gamma
is and how it is used. But the following concepts are necessary to understand
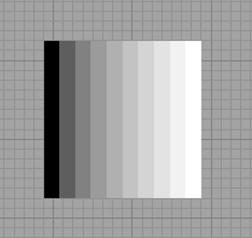
the explanations that follow. Linear Below is a Linear ramp. It is Linear because
there are 10 equal steps. If you load this image into any graphics package and
sample each step with an eye dropper you will see that the steps are roughly
equal in value. This is good because you see them as roughly equal steps in
intensity on an sRGB
monitor. (This would be pretty much any consumer grade computer monitor made in
the last ten years)
Gamma 2.2
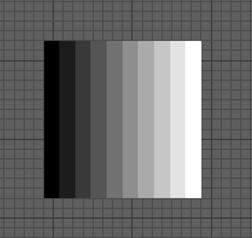
Function Here is a Gamma curve of 2.2 applied to the above image. As you can see
it dramatically darkens parts of the image. Black will stay Black and White
will stay White. Only the values between Black and White will have their value
shifted. If you load this image into a graphics package and sample the values
you will find that most of the colors have an intensity of less than .5 and the
differences between adjacent darks is almost negligible when compared to the
difference between the adjacent whites.
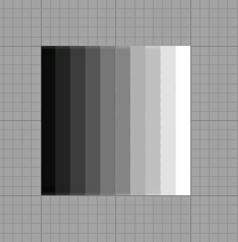
Inverse Gamma 2.2
Function Here is an Inverse Gamma of 2.2 applied to the first image. As you can
see it dramatically lightens the image. Black is still Black and White is still
White but the colors between are shifted to lighter values. If you load this
image into a graphics package and sample the steps you will notice the steps
between adjacent dark color is huge and the difference between adjacent light
colors is relatively small.
Recap Okay so now we have some principals, when you apply 2.2 Gamma curve to
an image it will dramatically darken the image. If you apply an inverse 2.2
Gamma curve to an image it will dramatically lighten the image. And finally if
you apply an inverse 2.2 Gamma curve to a 2.2 Gamma image you will get the
source image. Why Gamma CorrectThe human eye sees increasing intensities of light in a manner that resembles the inverse gamma curve.
Small differences in dark colors are significant and small differences
in light colors are hard to see. To make your monitor colors more vivid and
make paint programs work the way you anticipate the computer manufacturers
apply a sRGB curve to your colors. Making them appear
like this.
The colors appear to have equal steps. This is what sRGB
does for you. Unfortunately what works well for user interfaces and paint programs
does not work well for realistic 3D rendering. To counter act the effect of the
monitors sRGB correction Unreal applies an Inverse
Gamma correction to make the linear image appear like this.
Which is the way you eye perceives real light. This does cause some surprising issues. What is Unreal doing with TexturesTypically when an artist imports a texture into Unreal he selects the
image, says import, and accepts the default settings on the texture import.
This works well because after import the artist compares the image that they
have in Unreal with the texture they painted in Photoshop and they appear
identical. Photoshop Image Unreal Texture
But there is this curious behavior, when a texture is imported as a Photoshop Image Unreal
The key to understanding what is going on is in the use of sRGB flag in the Texture Properties. If you uncheck the sRGB flag on a texture it becomes relatively light compared
the how the image appears in Photoshop. Photoshop Image Unreal with sRGB
unchecked
This matches what we see with the This behavior is unexpected and unintuitive. When you ask Epic to
explain what is happening they tell you textures that are used for color
information should have the sRGB flag checked, and
textures that are used for masks and numerical calculations in shaders and
effects (like Normal maps) should have it unchecked. And if you follow this
simple guideline you mostly get the best effect. So what is this sRGB flag doing? Well modern
video cards have a built in Gamma function that is done in hardware. When the sRGB flag is checked it tells the video card to apply this
Gamma function when it decodes the texture for use in shaders or effects. Well
if it is applying a Gamma function why dont the textures appear dark? Remember
from the first section where when we applied a Gamma 2.2 function to out
texture it turned dark. The reason this doesnt happen is that Unreal has a post process step
that applies an inverse Gamma function to the image before displaying it on
screen. This is typically done in the uberPostProcessEffect
Node used in the post process effect chain. Source Texture sRGB checked Inverse Gamma Applied
Source Texture sRGB unchecked
Inverse Gamma Applied
You can play with the value used in this final post process step by
typing into the console GAMMA 1.0, you should see you image darken, if you type
GAMMA 2.2 it should be restored to normal. In code the value entered into the
console command is stored internally in a variable called outputgamma. This post process step is what makes your normal maps look washed out.
The Verify your sRGB setting If you incorrectly set the sRGB
flag for how the texture is used you can get strange results. For example if
you check sRGB on a What Unreal is doing with ShadersSo lets take a look at shaders. Textures are well and good but we
rarely apply textures to our models without lighting them, and lighting means
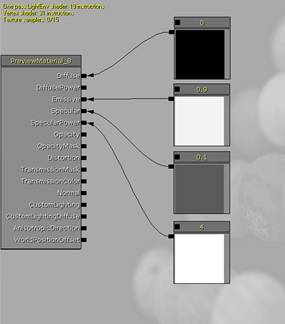
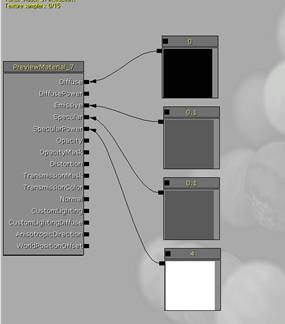
we need a shader. So here Ive made two simple shaders,
a light one and a dark one. Ive deliberately not put anything into the diffuse
because I want to focus exclusively on how Unreal affects my specular
highlights. So here Ive made two emissive shaders with specular highlights. We
can pretend that these shaders are for lightbulbs or
Christmas lights. Light
Shader Dark Shader
Some things to note, both shaders have a black diffuse, they both have
a spec color of .1 and a spec power of 4. The only place they differ is in
emissive color, one has an emissive of .1 and the other has an emissive of .9,
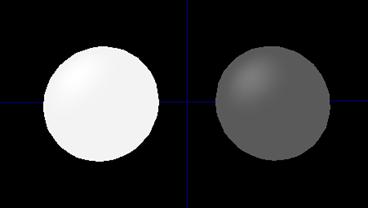
nearly black and nearly white. Lets see how they look. I have turned off post processing so we only
see the shaders colors.
No huge surprise here, two glowing spheres with two dim specular
highlights. But are the specular highlights the same? Both have the same
specular setting so you might expect the specular to appear identical, i.e. the
specular should appear relatively equally bright on both spheres. But it
doesnt appear to be, you can barely see the highlight on the left sphere,
whereas the right sphere has a very distinct highlight. Lets load this image into Photoshop and use the eye dropper to sample
some colors.
This table reveals some interesting information. First note that
difference between the specular highlight value on the Light sphere and its
emissive color is only .05. Well that explains why we can barely see the
highlight on the white sphere if at all. While the difference between the
specular highlight and the emissive color on the dark sphere is .13, making it
quite obvious since it over 2.5 times relatively stronger than the light
spheres specular. But there is something else to note. I set my emissive to .1 and .9 but
in my image I get .35 and .95. And actually for the dark sphere .1 is a really
dark color, but instead Im getting almost a medium grey on my dark sphere, its
not hardly dark at all. Remember that since emissive
is not affected by lighting it is just the pure color I set it too being passed
straight through. This is what you would expect to see in real life if you were to look
at two objects with the same material but one very dark and one very light. I
suggest you look at cars, look at how bright the reflections are on black cars,
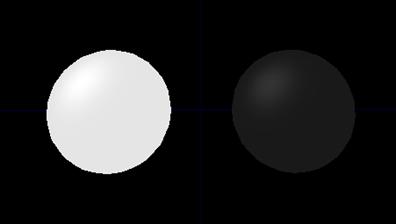
and how the reflection is relatively unnoticeable on a white car. Well to compare lets set Unreals gamma to 1.0 in the command line and
see what we get.
What a dramatic difference! You can see the highlight distinctly on the
light sphere now. And the dark sphere is actually pretty dark instead of almost
medium grey. Lets load this image into Photoshop and see what we get.
Another dramatic difference, notice that the emissive color is now the
color I set in the shader. And the difference between the spec highlight and
the emissive color is equal to the specular color for both shaders. This is the
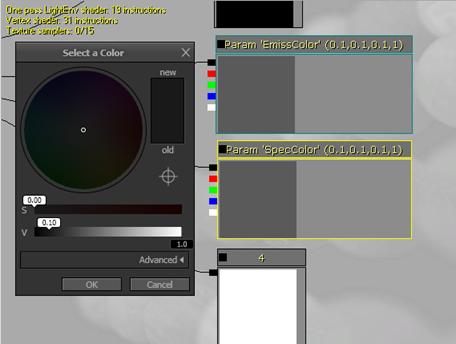
way you would expect the colors to work in a paint program. This color change is quite clear when you
use the color picker. Ive changed my shader constants so they use vector
parameters now so you can see what numbers Ive set and how they look compared
to the color picker.
You can clearly see in the color picker that I have selected a .1 value.
It is quite dark in the color picker. You can also see that in Unreal the
vector parameters are set to .1. But visually it appears to be a medium grey
and not the dark black that I picked. If you load a screen shot of this into
Photoshop you will see that the vector parameter swatch is displaying 90 which is .35 in Unreal and not the .1 I set. Shader Color ProblemWell you can work around this color shifting in the color picker, just
pick a darker color until you get what you want, ultimately what appears on
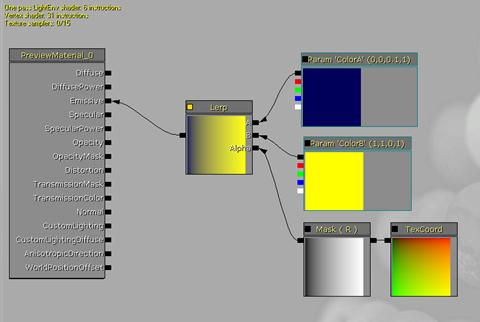
screen is the only thing that counts. Lets take a look at that. Here is a pretty simple shader that uses a
lerp between yellow and blue.
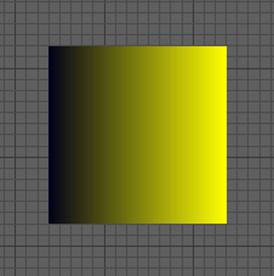
Lets apply it to a cube and see what it looks like. The cube on the left is our lerp in Unreals native gamma of 2.2, the
cube on the right is our cube in gamma 1.0.
You can see that in the left hand cube the yellow dominates the lerp
very strongly and holds onto it brightness through most of the lerp, the blue
only really kicks in just before the end. With the right hand cube the yellow
starts fading out and giving up its brightness to the blue in an even
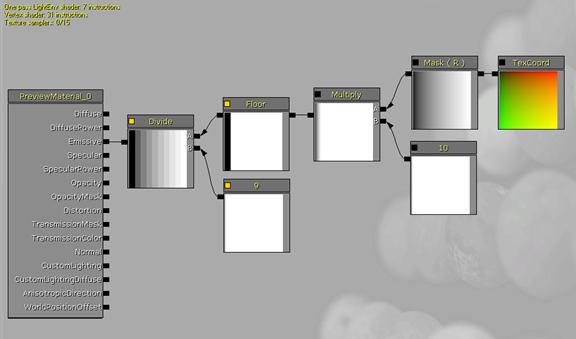
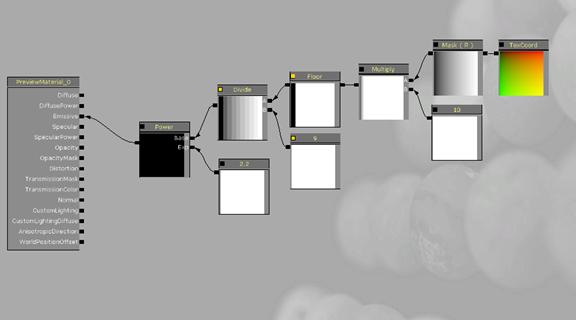
gradation. To help demonstrate what is going on lets make another shader. This
shader makes a ramp of ten equal steps, just like our texture in the first
section.
Now lets take a look at what happens. The shader ramp on the left is in Unreals gamma 2.2 and the shader ramp
on the right is in gamma 1.0. Gamma 2.2
Gamma 1.0
Inverse Gamma Ramp
Linear Ramp
If you compare these two images with the textures in the very first
section where we go over basic principles you will see that the ramp on the
right looks like our Linear ramp, while the ramp on the left looks like our
inverse gamma ramp, only one strong black, while most of the ramp is dominated
by very light tones. This shows us that Unreals post process step is applying an inverse
gamma to all our shading and light calculations. The result of this is causes our textures to look correct when the sRGB flag is checked but our shader math looks odd. If I
was to the use the Linear ramp texture in the first
section and apply it to the emissive channel, the gamma 2.2 image would look
correct. Ramp
Texture in 2.2 Gamma Ramp Shader in 2.2 Gamma If I was to set Unreals gamma to 1.0 to make my shader look correct my
lighting would look like this, which is cartoony.
Making Shaders and Textures matchWhat could you do to do to make my shader ramp match my texture ramp?
It seems intuitively obvious that you should be able to make a Linear shader
ramp that matches my Linear texture ramp while not getting the color/intensity changes
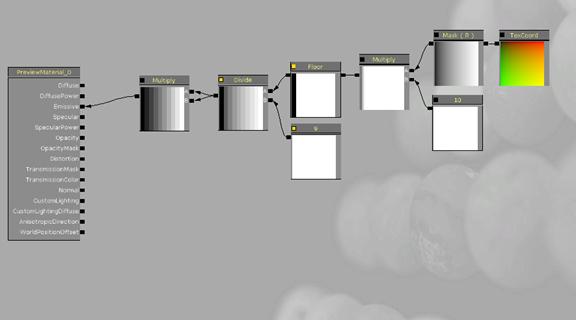
that we saw in the Lerp and the specular highlight examples. Well you can. If I apply a Gamma function on my shader ramp before
sending its color to the renderer I get this.
Ramp Texture in 2.2 Gamma Ramp Shader in 2.2 Gamma w Power
Now my texture and my shader are in agreement. Power functions are relatively expensive, and can be replaced with a multiply which is cheaper and most of the time satisfactory. Here is an example.
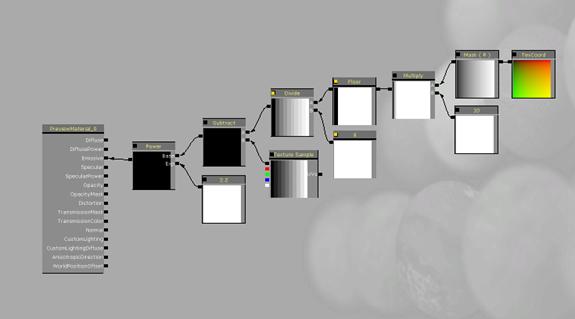
Shader Texture Blending
This reveals a problem with shader and textures being mixed. Here I have made a shader that blends my ramp texture with my ramp shader. In this example Im subtracting the color of my ramp texture from ramp shader. This is a simple way to make sure my rampshader actually matches my texture. If they do match the result will be black.
Here is the result:
That is remarkably not black. What happened here? Well if you remember our texture has an sRGB flag set on it. This means the texture gets converted. Source
Texture sRGB checked
Our shader ramp makes an image like this.
The difference between the sRGB checked
texture and our shader ramp is the result above. If we uncheck the sRGB flag on the texture we
now get.
This shows that the texture and the ramp are now producing virtually
the same result. But wait a minute unreal says when you use a texture for a color you
should have the sRGB flag checked. But to get my ramp
and my texture to be the same I had to uncheck the sRGB
flag. Color SpaceTime for more definitions. Color space is how we want colors to interact in paint programs. In a paint program if I add 5% white to 50% grey I get something like 55% grey. Like this:
See all the numbers add up neatly and give us a photoshop/cartoony look to our shader. Light SpaceLight space is how we want our colors to interact when we render 3D images. This is how real light is perceived by our eyes. Like this:
This gives us something matches real lighting but the numbers dont add up in an intuitive way. ConclusionSome care needs to be taken when making Unreal Shaders. Take some thought as to what your intent is as your making your shader. If you intend to blend colors you need to uncheck the sRGB flag for your color textures that you are blending perform all your blending operations and then convert the color using a Power 2.2 function before using it in lighting equations. If on the other hand you intend to blend light together you need to make sure that all the colors have been converted using sRGB, a Power 2.2 function, or through the color picker before adding them together. |
||||||||||||||||||||||||||||||||||||||||||||||||||||||||||||||||||||||||||||||||||||||||||||||||||||||||||||||||||||||||||||||||||