|
 |
|
|
Game Gamma ExplainedBackgroundTo understand Gamma there are a couple of basic
concepts about what Gamma does to images that need to be clear. I will not go
over all the principles of Gamma since there are many references on what Gamma
is and how it is used. But the following concepts are necessary to understand
the explanations that follow.
LinearBelow is a Linear ramp. It is Linear because
there are 10 equal steps. If you load this image into any graphics package and
sample each step with an eye dropper you will see that the steps are roughly
equal in value. This is good because you see them as roughly equal steps in
intensity on an sRGB
monitor. (This would be pretty much any consumer grade computer monitor made in
the last ten years)
Gamma 2.2 FunctionHere is a Gamma curve of 2.2 applied to the above image. As you can see
it dramatically darkens parts of the image. Black will stay Black and White
will stay White. Only the values between Black and White will have their value
shifted. If you load this image into a graphics package and sample the values
you will find that most of the colors have an intensity of less than .5 and the
differences between adjacent darks is almost negligible when compared to the
difference between the adjacent whites.
Inverse Gamma 2.2 FunctionHere is an Inverse Gamma of 2.2 applied to the first image. As you can
see it dramatically lightens the image. Black is still Black and White is still
White but the colors between are shifted to lighter values. If you load this image
into a graphics package and sample the steps you will notice the steps between
adjacent dark color is huge and the difference between adjacent light colors is
relatively small.
RecapOkay so now we have some principals, when you apply 2.2 Gamma curve to
an image it will dramatically darken the image. If you apply an inverse 2.2
Gamma curve to an image it will dramatically lighten the image. And finally if
you apply an inverse 2.2 Gamma curve to a 2.2 Gamma image you will get the
source image. Why Gamma CorrectThe human eye sees increasing intensities of light in a manner that resembles the inverse gamma curve.
Small differences in dark colors are significant and small differences
in light colors are hard to see. To make your monitor colors more vivid and
make paint programs work the way you anticipate the computer manufacturers
apply a sRGB curve to your colors. Making them appear
like this.
The colors appear to have equal steps. This is what sRGB
does for you. Unfortunately what works well for user interfaces and paint programs
does not work well for realistic 3D rendering. To counter act the effect of the
monitors sRGB correction most game renderers apply an Inverse
Gamma correction to make the linear image appear like this.
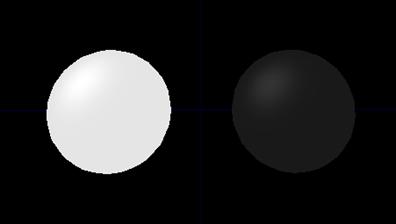
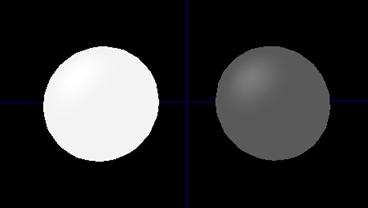
Which is the way you eye perceives real light. This does cause some surprising issues. Color SpaceTime for some definitions. Color space is how we want colors to interact in paint programs. In a paint program if I add 10% white to 90% grey I get 100% white. If I add 10% white to 10% grey I get 20% grey, like this:
See all the numbers add up neatly and give us a result that looks like what you could reproduce in any paint package giving our shaders a painted look. Light SpaceLight space is how we want our colors to interact when we render 3D images. This is how real light is perceived by our eyes. For both the shader on the left and the right the specular highlight was set to 10% like in the example above.
You can see that a 10% highlite onthe light colored shader is not visibly as strong as the same 10% highlighton the dark shader. This visible difference is reinforced by the values we get when we sample the above image. As you can see doing our math in light space gives us something matches our experience of real lighting but the numbers dont add up in an intuitive way. Why this is ImportantIn games not everything we render to the screen is supposed to be treated like light. Some things are intended to be their actual color value and are expected to act like they do when painted in a paint program. This is an important distinction. If you want something to act like it is lit then you need to apply a gamma function to it and send it through your rendering pipe to have an inverse gamma applied on the final image. On the other hand if you want some thing to appear as if it is painted or at least react like it did in the paint program. You need to take care not to apply a gamma function to it before you use it. UIsOne example is the UI. We dont gamma correct the UI because the artist has already drawn it in the colors that he wants it displayed in. Normally UIs are not intended to appear as if they are being lit in the scene. So we treat UI elements in Color Space and make sure they get rendered to the screen without gamma correction. FXAnother case are FX, sometimes we want our FX to be rendered as if they are lit in scene or at least reacting as if they are light elements. In this case we want them to be gamma corrected. In other cases the FX is a status effect, in which case it is actually an extension of the UI. It is intended to represent information important to the player, and not appear to be something realistic. In this case you dont want the colors to gamma corrected. TexturesIn many computer games we create textures and tints so that they can be blended together at runtime to save memory and allow character customization. The intent of blending the textures and tints is to make them appear as if they had been blended in a paint program. For example if you wanted to emulate a blend mode from Photoshop in your shader you need to make sure the texture is not sRGB decoded before you use the blend mode. After you do the blend then you need to apply a power 2.2 function to the resulting color before using it in your lighting equation. Non Photorealistic GamesIf you are making a game that is not to appear photorealistic you probably dont want to apply the inverse gamma correction on your final render. If it is supposed to look like a cartoon the lighting and rendering is not supposed to appear photorealistic and the colors are not supposed to blend like light. One important side effect of gamma correction is that it tends to slightly desaturate your scene making the colors all very slightly washed out. Not applying the gamma correction on the final render will make your colors slightly more vibrant and rich. ConclusionSome care needs to be taken when making Shaders. Take some thought as to what your intent is as your making your shader. If you intend to blend colors you need to uncheck the sRGB flag for your color textures that you are going to blend. Do all your color blending operations first and then convert the resulting color using a Power 2.2 function before using it in lighting equations. If on the other hand you intend to blend light together you need to make sure that all the colors have been converted using sRGB, a Power 2.2 function, or through some othermeans before adding them together. |
||||||||||||||||||||||||||||||||||||||||||||||||||||||||||||||||||||||